Quick Start Guide: Difference between revisions
Steps complete |
Finished Install Steps |
||
| Line 18: | Line 18: | ||
Make a custom profile. 1.18.2 and Fabric | Make a custom profile. 1.18.2 and Fabric | ||
[[File:CreateCurseProfile.gif|center|Step 2: Make a Profile| | [[File:CreateCurseProfile.gif|center|Step 2: Make a Profile|725x725px|frameless]] | ||
=== Step 3: Download and Install [https://github.com/jb0s/blockgame-enhanced Blockgame Enhanced mod] === | === Step 3: Download and Install [https://github.com/jb0s/blockgame-enhanced Blockgame Enhanced mod] === | ||
| Line 26: | Line 26: | ||
3.2 Move the jar file to the mod folder. | 3.2 Move the jar file to the mod folder. | ||
[[File:InstallEnhanced.gif|center | [[File:InstallEnhanced.gif|center|789x789px|Step 3.2 Installing Mod to the folder|frameless]] | ||
=== Step 4: Install Chime === | === Step 4: Install Chime === | ||
Chime is a requirement for our community made ResourcePack. | Chime is a requirement for our community made ResourcePack. | ||
[[File:Chime.gif|center| | [[File:Chime.gif|center|789x789px|frameless]] | ||
| Line 37: | Line 37: | ||
=== Step 5: Install [https://github.com/Meridanus/BlockGame_Chime_ResurcePack Meridanus BlockGame Chime ResurcePack] === | === Step 5: Install [https://github.com/Meridanus/BlockGame_Chime_ResurcePack Meridanus BlockGame Chime ResurcePack] === | ||
Choose resource tab for your profile and install our resource pack | Choose resource tab for your profile and install our resource pack | ||
[[File:Resources.gif|center| | [[File:Resources.gif|center|789x789px|frameless]] | ||
=== Step 6: Turn on the resource pack in Minecraft === | === Step 6: Turn on the resource pack in Minecraft === | ||
When you open up Minecraft, the custom resource pack won't be enabled by default. you have to open minecraft and choose it in the settings. | When you open up Minecraft, the custom resource pack won't be enabled by default. you have to open minecraft and choose it in the settings. | ||
[[File:ResourcesInstall.gif|center| | [[File:ResourcesInstall.gif|center|844x844px|frameless]] | ||
=== Step 7: (Optional) Install map mod === | |||
Some users have found a map enhances their experience. Journeymap is a nice client side map mod. | |||
[[File:JourneyMap.gif|center|frameless|844x844px]] | |||
=== Step 8: PLAY GAME! === | |||
Revision as of 15:19, 21 November 2023
Basic Installation

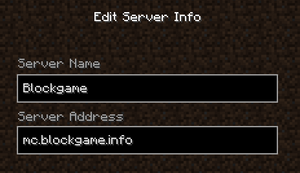
You can connect to Blockgame just like any other Minecraft server. The Server Address field should be mc.blockgame.info as shown in the image below! You can connect in any client v1.18.2 to v1.19.4 in either Java or Bedrock edition without anything other than the URL. If you're on console you can get connected using this quick Setup Guide.
You don't need any special downloads, resource packs, or anything beyond the Vanilla client. All of this is built through server-side modifications so you don't need anything to get started!
Advanced Installation
There are mods and resource packs that have been created by the community. If you would like to use them, Follow this guide to install them. There are multiple ways to install these mods and resources. These steps include installing another software to manage the mods and resource packs. They are making textures and resources for our custom items.
Step 1: Install CurseForge
Install CurseForge
Step 2: Create a Profile
Make a custom profile. 1.18.2 and Fabric
Step 3: Download and Install Blockgame Enhanced mod
3.1 Go HERE and download the jar file.
3.2 Move the jar file to the mod folder.
Step 4: Install Chime
Chime is a requirement for our community made ResourcePack.
Step 5: Install Meridanus BlockGame Chime ResurcePack
Choose resource tab for your profile and install our resource pack
Step 6: Turn on the resource pack in Minecraft
When you open up Minecraft, the custom resource pack won't be enabled by default. you have to open minecraft and choose it in the settings.
Step 7: (Optional) Install map mod
Some users have found a map enhances their experience. Journeymap is a nice client side map mod.

